
Thinking about giving your NYC home a fresh look? You’re in the right place! Kitchen and bathroom remodeling can totally change how your home feels and works, making your living space much better. In New York City, where space is tight and style is important, many people are looking for good bathroom remodel contractors to make their homes more luxurious and efficient. Let’s explore how to upgrade your NYC home and see how DCON Renovations can help make your dream home a reality, perfect for city living.
Why Kitchen & Bathroom Remodeling Matters
Updating your kitchen and bathroom isn’t just about making things look nice. It’s a smart move that can pay off in many ways, both in money and in how much you enjoy your home. Here’s why these renovations are so important, especially in New York City:
- Your home becomes worth more: In NYC’s competitive housing market, updated kitchens and bathrooms can make your property sell for a lot more, often giving you back 70-80% of what you spent.
- You’ll feel better in your space: Well-designed kitchens and bathrooms can make your daily life easier and more relaxing.
- Everything works better and saves you time: New appliances and smart layouts can make your daily tasks quicker, which is great for busy NYC life.
- Your home fits you better: Custom renovations let you make your space just right for you, whether that’s a fancy kitchen for parties or a spa-like bathroom for relaxing after a long day in the city.
- You can save on energy bills: Using energy-saving fixtures and appliances can lower your utility costs, which is important in expensive NYC.
Latest Trends in NYC Kitchen & Bathroom Remodeling
NYC homes are leading the way in cool new designs that look good, work well, and save space. Here’s what’s popular right now in NYC kitchen and bathroom remodeling:
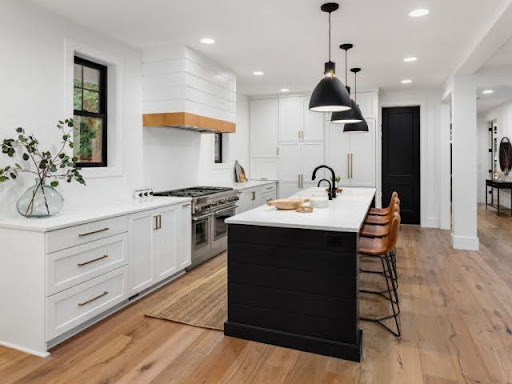
1. Sleek, Minimalist Designs
People like clean, simple looks, which work great in small NYC spaces. This style makes apartments feel bigger and calmer. Think white cabinets, smooth countertops, and hidden appliances. It keeps things tidy and makes rooms feel more open.
2. Smart Technology
Kitchens and bathrooms are getting smarter. You can have faucets that turn on with your voice, mirrors that show the weather, and fridges that make shopping lists. In bathrooms, you can set your perfect shower temperature and have toilets that clean themselves. These cool gadgets make life easier and help save water and energy.
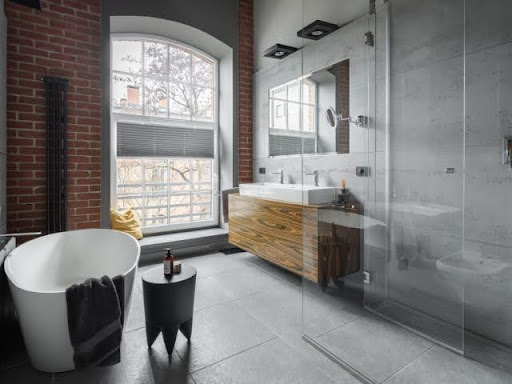
3. Luxury Spa-Inspired Bathrooms
Many NYC homeowners want their bathrooms to feel like fancy spas. They’re adding big rain showers, beautiful bathtubs, and using fancy materials like marble. Heated floors and special lighting make the bathroom feel extra special, like a mini vacation spot in your own home.
4. Eco-Friendly Materials
New Yorkers care about the environment, so they’re choosing green materials for their renovations. This means using paints that don’t have harmful chemicals, lights that save energy, and fixtures that use less water. Some people are even using recycled wood or stone to make their homes look unique and help the planet.
Key Considerations for a Successful Remodel
Before you start your kitchen or bathroom renovation in NYC, there are some important things to think about. These can really affect how well your project turns out:
Budget Planning
Remodeling can be expensive, especially in NYC. It’s important to make a detailed budget. Look up how much similar renovations cost in your area. Remember to include money for materials, workers, permits, and maybe a place to stay if you need to leave your home during the work. It’s smart to set aside 10-20% extra for surprises, especially in older NYC buildings where you might find unexpected problems. You might want to talk to a financial advisor about ways to pay for your renovation.
Design & Material Selection
In NYC, where space is tight and things get a lot of use, choosing the right design and materials is really important. Pick strong, high-quality materials that will last a long time and still look good. Think about things that can do more than one job to save space, like pull-out cabinets in kitchens or wall-mounted toilets in bathrooms. When picking finishes, think about what will still look good years from now. It’s also good to think about materials that can help keep noise down, which is important in noisy NYC. Talk to designers who know NYC well to get good ideas for urban homes.
Hiring the Right Contractor
This is super important and can make your renovation go well or badly. In NYC, you need a contractor who does good work and understands the special challenges of working in the city. Look for bathroom remodel contractors like DCON Renovations who have done lots of work in NYC buildings, including old apartments and brownstones. They should know how to get permits and follow city rules. Check their licenses and insurance, and ask to talk to people they’ve worked for before in similar NYC buildings. A good contractor will also know how to handle tricky things like getting materials into buildings with small elevators or stairs.
Increased Home Value
Renovations boost property value in competitive NYC market
Enhanced Functionality
Improved layout and storage for small NYC spaces
Modern Aesthetics
Updated look with durable, stylish materials
Improved Energy Efficiency
Lower utility costs with energy-saving fixtures
Step-by-Step Guide to Kitchen & Bathroom Remodeling
Ready to start your remodel? Here’s what to expect:
1. Initial Consultation & Planning
This is where you talk about what you want with your contractor. Tell them your ideas, what you need, and how much you can spend. They’ll look at your space and take measurements. Show them pictures of what you like and tell them about your lifestyle. A good contractor will give you ideas based on what they’ve done in other NYC homes. They should also tell you how long it might take and give you a rough idea of the cost.
2. Design & Layout Approval
After the first planning, your contractor will show you detailed drawings of your new space. They might even use 3D pictures or virtual reality to help you see how it will look. Make sure the layout works well, especially in small NYC kitchens and bathrooms. Think about how you’ll move around the space and where you’ll store things. This is when you pick out things like cabinets, countertops, and fixtures. Take your time to make sure everything is just how you want it.
3. Permitting & Compliance
Getting permits in NYC can be tricky, but it’s really important. Your contractor should handle all of this for you. They’ll send plans to the city, get the permits you need, and set up inspections. They should know all about NYC’s special rules, like for old buildings or co-ops. This part can take a few weeks. While you wait, you can start getting ready for the construction, like clearing out your stuff or finding a place to stay if you need to.
4. Construction & Finishing Touches
This is when your space starts to change. Your contractor will manage everything from taking out the old stuff to putting in new fixtures and appliances. In NYC, they need to be careful about when they can work and how to get materials into the building. A good contractor will keep things running smoothly and not bother your neighbors too much. They should tell you how things are going and let you know if there are any problems. At the end, pay attention to the little details – these can make your new space really special.

How to Choose the Best Bathroom Remodel Contractors
Picking the right contractor is super important for your NYC renovation. Here’s how to find a good one:
- Check if they have the right licenses and insurance: In NYC, contractors need special licenses. Make sure they have these and insurance to protect you and their workers.
- Look at pictures of their past work: Ask to see photos of projects they’ve done, especially ones like what you want to do.
- Read what other people say about them: Look at reviews online and ask to talk to people they’ve worked for before.
- Make sure they give you a clear price and timeline: A good contractor should tell you exactly how much it will cost and how long it will take.
- Choose someone who listens to you and answers your questions: You want someone who understands what you want and explains things clearly.
- Check if they know about NYC-specific challenges: Ask if they’ve worked on buildings like yours and how they handle things like strict building rules.
- Ask about who else they work with: A good contractor should have reliable people for things like plumbing and electrical work.
- Find out how they manage projects: Ask how they schedule work and keep you updated. This can help you know if your project will go smoothly.
Why Choose DCON Renovations for Your NYC Remodel?
DCON Renovations is a great choice for NYC home renovations. Here’s why:
- They’re experts at creating fancy kitchens and bathrooms: DCON knows how to make spaces that look good and work well in NYC’s unique homes.
- They’ve worked on lots of NYC homes: They’ve done renovations all over the city, so they know how to handle the special challenges of working in NYC.
- They care about doing good work and making clients happy: DCON pays attention to details and uses high-quality materials that work well in NYC homes.
- They know all about NYC building rules: This means your renovation will follow all the city’s rules without any hassle.
- They can work with different types of NYC buildings: Whether you live in a new apartment or an old brownstone, DCON can make your renovation fit your building’s style.
- They’re good at managing projects: They know time is important in NYC, so they work to finish projects on time and with minimal disruption.
- They handle everything from start to finish: This means you only have to deal with one company throughout your whole renovation, which makes things easier for busy NYC homeowners.
Getting Started with Your Remodeling Project
Ready to make your NYC home amazing? Here’s how to start:
- Call DCON Renovations to set up a meeting: This is your chance to talk about what you want and ask questions.
- Think about what you want and how much you can spend: Make a list of things you’d like and figure out your budget.
- Get ready for the renovation: Start cleaning out your space and think about where you’ll stay if you need to leave during the work.
- Find pictures of designs you like: Collect images of kitchens or bathrooms you love, especially ones that work well in NYC spaces.
- Check your building’s rules: If you live in an apartment building, find out if there are any special rules for renovations.
- Think about the future: Consider how your needs might change and talk to DCON about designs that can adapt.
- Be open to suggestions: DCON knows a lot about NYC renovations and might have cool ideas you haven’t thought of.
Want to learn more about bathroom remodel contractors and see how DCON Renovations can change your NYC home? Visit their website to see cool examples of their work and get expert advice. Get ready to make your home better and worth more in NYC’s tough housing market!
Conclusion
Remodeling your kitchen and bathroom in NYC is a big deal. It’s not just about making your home look nicer – it’s about making your life better and your home worth more. In NYC, where homes are expensive, these changes can really transform your space, making it work better for you and look amazing. By choosing a good contractor like DCON Renovations and planning carefully, you can handle the tricky parts of NYC renovations and create a home that stands out. Whether you live in a fancy Manhattan apartment or a classic Brooklyn brownstone, a well-done kitchen or bathroom remodel can make your daily life better and make your neighbors jealous. Ready to start? Reach out to DCON Renovations and begin making your NYC home dreams come true. Your perfect NYC home is just a renovation away!